Tuesday 30 April 2019

Renegade knights WIP images - and how they where made Part 3 Black Legion / Sons of Horus


Hi everybody, it has been a while since I started my mammoth task of creating a heavily converted Renegade Knight army.  So, I thought it was about time I showed my WIP images so you can see how exactly they where created, Welcome back to part 3 Black Legion.

If you have been following this mini series you should be familiar with the two previous Renegade Knights and you can see I am a bit of a fan of Daemonic Possession.  I have been experimenting with how it would manifest itself, by adding a lot sculptural pieces to them, but for this one I wanted to do something different.  Rather than adding I've gone for reduction, particularly with the main daemonic possession Chaos 8 pointed star symbol on the main carapace.  This was achieved by applying a 1cm thick layer of Milliput underneath the carapace making sure I got into all the nooks and crannies, following the design that I had drawn on the top.  Once fully cured I used two different sizes of Holesaws to create the small and large circles on the design. I then used a Dremel to carve out the design.  Finally I used Brown stuff to sculpt the armour cracking and deforming around the branded style symbol. 


As a small contrast to the brand I sculpted the Son's of Horus symbol on one shoulder armour using Green Stuff to create the same type of  armour cracking and deforming. On the other shoulder, which I have lost the image, I used the actual surface of the pad as the eye and created extra armour on top as if the eye to give the illusion of the eye forming under the armour and pushed the armour outwards and falling off. 


Going back to my original thought of this Knight would be a reduction of it self, I clearly forgot this premise and failed when it came to crating the Battle cannon shield mounts.  And they became a little large and larger than I intended, luckily they fitted but only just....  The armour mounts are laser cut 3mm plasticard scuplted down with a Dremel to form sharp angular edges and on the reverse I have added Brown stuff replicating the front. 


I used an airbrush for the fake light refection/highlight in the eye but the rest of the Knight was painted by hand


Thursday 18 April 2019

Renegade knights WIP images - and how they where made Part 2 Nurgle

Hi everybody, it has been a while since I started my mammoth task of creating a heavily converted Renegade Knight army.  So, I thought it was about time I showed my WIP images so you can see how exactly they where created, Welcome back to part 2 Nurgle.  

I know I have shown these images before but I thought I would collate them into this short series of posts, and now this project is complete I can look back and reflect on my previous comments.  

"I've wanted to do a Nurgle Knight for ages but I never got around to it, and the longer I left it the more and more models became available for conversion like the Glottkin Knight; and if I'm honest I almost did the conversion then I saw someone on ebay selling all the bits I needed from the Great Unclean One, and I thought it would make for an easier and less time consuming build (the jury was out on if it was quicker or not)" quoting my self from a previous post

That last comment is still an issue I cannot resolve is it easier to kit bash or to sculpt from scratch or under an underlying base model.  I will be approaching this subject again in the future, but for now; pros and cons, kit bashing vs new sculpts.

Kit bashing:-
Although you may have amazing plastic bits that will look good on a model the problem is that most of the time they do not fit, and we spend an enormous amount of time trying to get them to fit.  Then we need to make the join seamless, which at times can be another lengthy process of sculpting and modelling.

New scuplts:-
Right from the off you can create exactly what you want depending on skill and budget.  like most things in life if it's worth doing well take your time don't try and do it all in one go.  Create an under sculpt first so you can add or take away after.  most of my work days days or weeks.  Now I will interject with a disclaimer here and say "I do not consider myself to be a great sculptor or even a good sculptor, I just love doing it and like to consistently push myself and improve".  Now there may be people reading this thinking "yeah rubbish your better than me and I can never do that"... to this I would say, I thought that way too, but until you give it a go and are prepared to fail you will never learn and improve.  Don't get despondent with failure it is a good thing, it gives you time to reflect and consider "if I did it again how could I improve it".

So if we consider these facts I would say that kit basing is a little faster but sometimes we have to make compromises, and sculpting your own takes patience time and a little bit more kill.  So once you have mastered kit bashing then it will be time to move onto sculpting your own conversions. 

Generally Materials used:-
Milliput - White and Yellow Grey
Grey Stuff
Brown Stuff
Green Stuff
Plasticard
Spare bits from the Great Unclean One
Cocktail sticks


Thursday 11 April 2019

Renegade knights WIP images - and how they where made Part 1 Khorne


Hi everybody, it has been a while since I started my mammoth task of creating a heavily converted Renegade Knight army.  So, I thought it was about time I showed my WIP images so you can see how exactly they where created.  

First up,  Khorne.  When converting a model I generally just use the materials I have and I "make do".  It is extremely rare that I will go out and buy materials just for the purpose of that model.  There is two reasons for this:- 1. I am incredibly lazy and 2. I don't like spending money.  Having said that I did buy Brown stuff specifically for his Lightning claw style fists, but then used them to create his hands when I should have used either Grey stuff or Green stuff. 

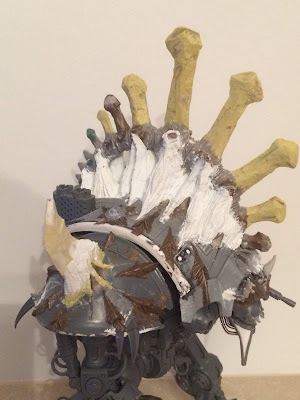
I also have to be honest and apologies, because I have no idea why I didn't take any WIP images of how I created the Spine.  The spine is just made up of 2mm wire and then layer upon layer Yellow Grey Milliput.  I like to built up the milliput so it is bigger then I need it to be, the reason being is that I like to carve into it, unlike Green Stuff which is a lot more precise and you can create the desired shape with out a reductive process.  You can see that the smaller 'Spinous Processes' are made from both Brown and Grey Stuff, I broke them while carving into them :) 

Materials used:-

Milliput - White and Yellow Grey
Grey Stuff
Brown Stuff
Green Stuff
Plasticard
2mm Wire


Tuesday 9 April 2019

WIP Roboute Guilliman - with NMM Gold Armour pt5


 Welcome back to part 5 and he is finally finished.  I added the eagles head from his original base and a column from the Kill Team box set, everything else has been carved from Foamex board (the stuff sign-writers print onto) which is condensed foam.  I find Foamex board has a lovely quality for doing scenery of this type, if you score it and snap it gives a great masonry texture in the break perfect for rubble.