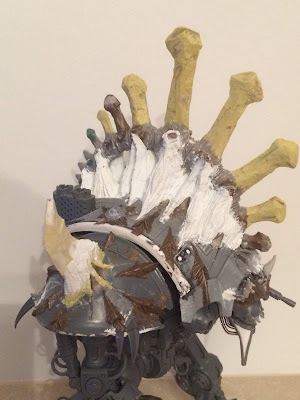
Hi everybody, it has been a while since I started my mammoth task of creating a heavily converted Renegade Knight army. So, I thought it was about time I showed my WIP images so you can see how exactly they where created.
First up, Khorne. When converting a model I generally just use the materials I have and I "make do". It is extremely rare that I will go out and buy materials just for the purpose of that model. There is two reasons for this:- 1. I am incredibly lazy and 2. I don't like spending money. Having said that I did buy Brown stuff specifically for his Lightning claw style fists, but then used them to create his hands when I should have used either Grey stuff or Green stuff.
I also have to be honest and apologies, because I have no idea why I didn't take any WIP images of how I created the Spine. The spine is just made up of 2mm wire and then layer upon layer Yellow Grey Milliput. I like to built up the milliput so it is bigger then I need it to be, the reason being is that I like to carve into it, unlike Green Stuff which is a lot more precise and you can create the desired shape with out a reductive process. You can see that the smaller 'Spinous Processes' are made from both Brown and Grey Stuff, I broke them while carving into them :)
Materials used:-
Milliput - White and Yellow Grey
Grey Stuff
Brown Stuff
Green Stuff
Plasticard
2mm Wire


You Sir are a warped Genius. You should be purged... ;)
ReplyDeleteLOL! I spat my brew all over my keyboard :)
DeleteDang! That is incredible.
ReplyDeleteThank you Matt :)
DeleteGreat stuff! Love how this model came together, and such a great paint job too.
ReplyDeleteThanks Mike :)
ReplyDeleteI'm almost up to the carapace/armour modifications on mine and very wary of mucking it up. I want to copy your idea of embossing the shoulder plates with plasticard shapes but not sure how to make a flat surface bond to a curved one. Oh well, I should just get on with it. Thanks for sharing these posts. Your work is inspirational.
ReplyDeleteThanks mate, but you make me want to start again you have some great ideas. To be honest i used plastic glue and small clamps it works a treat because it melts it into place :)
ReplyDeleteUseful to know. I was wondering if you'd used a heat gun but plastic glue effectively melts it just as good. Don't have any clamps tho. May have to use fingers.
DeleteThat works too lol :)
Delete